Guide to successful pump installation.
Installation checklist
Read and understand the instruction manual.
The foundation must be firm, level and clean of debris. Use the appropriate foundation.
Install the stand on the stand.
Install the pump and driver on the base plate.
Add the right oil to the right level in the bearing housings (pump, gear reducer, etc.).
Check the initial alignment.
Ground the base to the foundation.
Read the plumbing instructions below. Install the plumbing.
Complete the second level check and readjust the piping as needed.
Complete the rotational check of the driver by removing the coupling element.
Check the correct settings of the pump.
Install peripherals.
Install the coupling.
Prime and bleed the pump and system, and check the system valves and components. Complete the pre-startup check steps.
Recheck the alignment to make sure that the weight of the fluid in the piping is not changing the alignment.
Start the unit.
Check the appropriate indicators such as pressure, flow, temperature, vibration and noise.
Check the alignment again. If the fluid is above 200°F, perform a “hot alignment”.
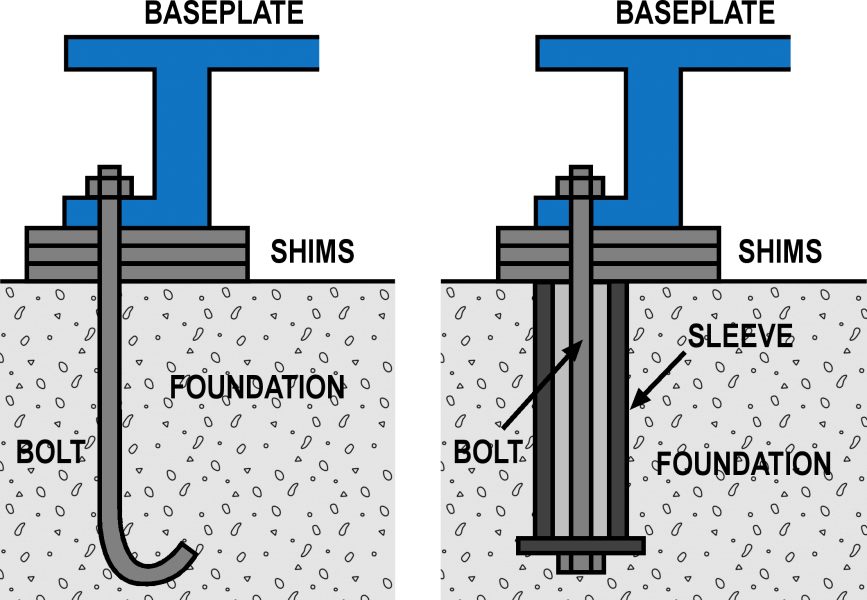
Foundation
The pump must be properly aligned with the motor as well as the piping system. Longevity pumping success starts with a strong foundation. In general, a pump should be mounted on a solid base plate and supported by a strong concrete foundation.
Anchor bolts are usually sleeve type or “J” type as shown above and should be placed in accordance with the approved outline of the base plate. The concrete foundation should be substantial enough to absorb any vibration and a Form a permanent rigid support for the base plate.
This will level the foundation and remove any distortion. The entire foundation surface should be leveled by chipping away any defective concrete, leaving it uneven, but level. Then the surface should be free of all oil, grease and loose particles. While individual practices vary throughout the industry, most leading companies tend to remove the pump and driver from the base plate prior to installation.
To avoid stress and distortion of the equipment, all surfaces on a plate should total 0.002 inch. The base plate should be supported on leveling screws, hoses, or metal wedges with a small cone located close to the base screws. . All leveling screws and other parts that need to be protected from grout splash should be coated with wax to prevent grout from sticking to them. Check the machined mounting surfaces on the base plate by adjusting the leveling devices and using an accurate level. Make sure the machined mounting surfaces of the base plate are horizontal, flat and parallel.
Tighten the foundation anchor bolts evenly and double-check the level. When the base plate is level, check that all retaining wedges or hoses are in full contact with the base and base plate.
The grout should be allowed to harden according to the manufacturer’s instructions. The temperature of the base plate, grout and foundation should be maintained between 40°F and 90°F during injection – and for at least 24 hours afterwards. When using a cement-based grout, follow the grout supplier’s instructions closely and ensure that the grout is placed quickly and continuously to avoid freezing of the joints and voids below the base plate.
Shaft alignment
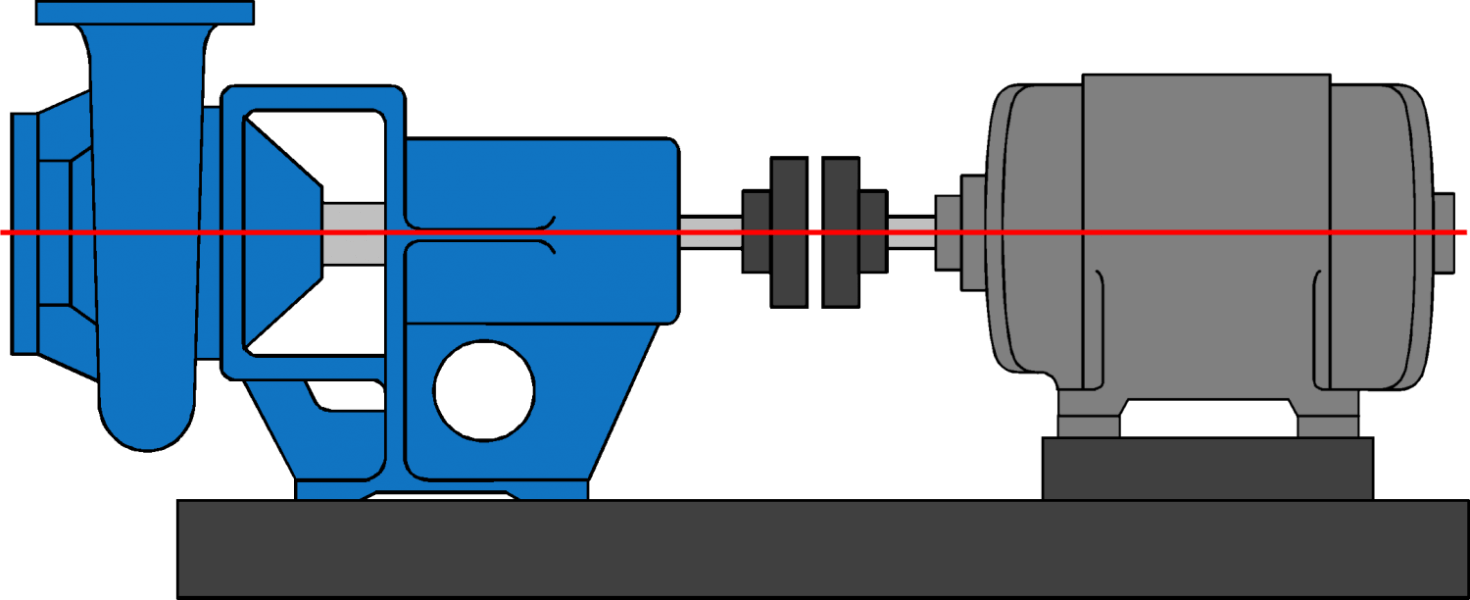
To maintain proper shaft alignment, you must start with proper pipe alignment and support. Proper shaft alignment is critical to equipment life. This means that the pump and motor shaft are linear in both horizontal and vertical planes.
See the checklist above for more information. Please note that many pump skids are aligned by the manufacturer. However, alignment should be checked after installation and before rebooting
.
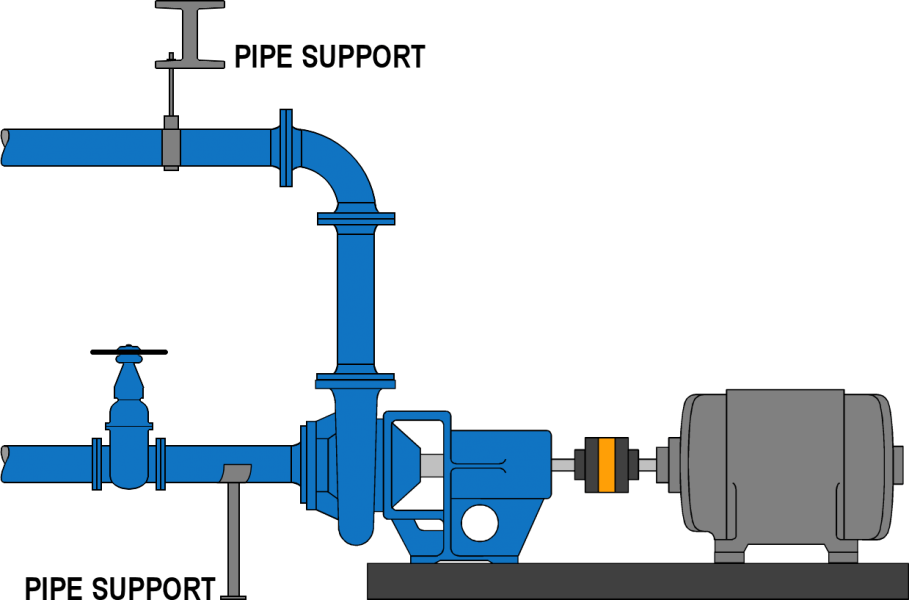
The pipe support must be balanced so that when the fluid is introduced, there is no movement that causes pressure on the pipe against the pump. Do not create on pump fluid connections. Pipe strain is the main factor in shaft misalignment.
piping
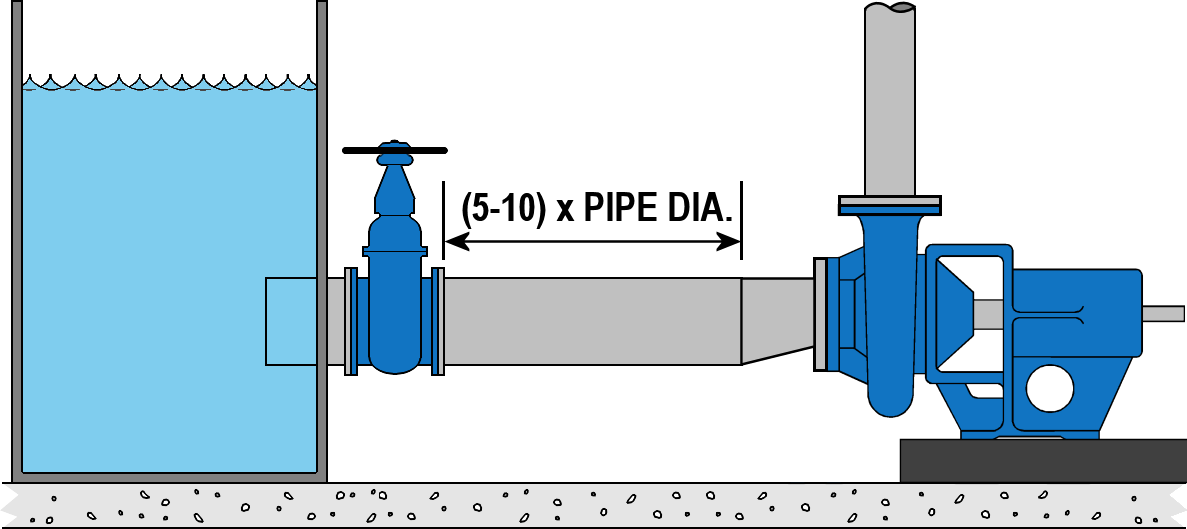
This reduces turbulence in the pump, which reduces unwanted vibrations. As a general rule, the suction side is run with a straight pipe, 5 to 10 times the diameter of that pipe, between the suction reducer and the first obstruction in the line. to be
Axial alignment check
While some shaft couplings can compensate for some shaft misalignment, it is still recommended that you align the equipment to the manufacturer’s specifications, not the coupling specifications. The second alignment should be done after the pipe is installed and before commissioning.
Shaft misalignment can lead to premature seal and bearing failure and is often caused by:
Improper installation / shimming of equipment.
Pipe strain caused by misalignment with pump fluid connections
Pipe strain is caused by improper pipe support.
rotate direction
Even pumps with keyed impellers and locknuts can be hydraulically loosened in time. Before operating the equipment, it is very important to disconnect the pump before checking the rotation of the driver. Running the pump in reverse for even short periods of time can cause catastrophic failure. Some pumps use threaded impellers that can unscrew if they run in the opposite direction they were designed for.
Pre-startup review and start-up procedures
The liquid has more mass and is thrown out. Fill and vent the pump and system. Check the system valve. The review and confirmation of the previous steps have been done. Remember, you cannot drain a running pump. The liquid is removed, but the air trapped in the center of the device remains.
If the pumped fluid is very hot (above 200°F), performing a “hot alignment” is also a good practice to start the unit. Be prepared to stop the machine immediately if something doesn’t look right. Check for proper pressure, flow, oil and bearing temperature, vibration and noise. After the pump has run for a short time, it’s a good idea to check the alignment again.
Author of the article: Ismail Tabatabaei



بدون دیدگاه